
STM32 Environment Setup
STM32 Environment Setup
This page has instructions for setting up a development environment for STM32 MCUs. Instructions for Windows, Mac, and Linux are all on this page.
After following these instructions, you will have STM32CubeMX installed, along with a CLion development environment for connecting to and debugging MCUs.
Note: You can get a working development environment without following these instructions exactly. For example, if you are a diehard VScode user, there is a way to set everything up to use VSC, but it takes a lot more time and involved a lot of launch configurations, which the writer of these instructions does not have the patience to figure out. If you decide to roll your own setup, be warned: no one can help you if it doesn’t work.
STM32CubeMX
STM32CubeMX (or from now on just MX) is a graphical MCU configuration utility distributed by STMicro themselves. This is what we use to generate some starter code for the microcontroller which handles a lot of the hard or low level stuff that would be an extreme pain to figure out manually.
MX is installed like any normal program on Windows and Mac. Download the correct installer from here. As of writing, LRI has settled on version 6.16.1, so make sure to download that version specifically.
For Linux, ST distributes a ZIP file containing an install script. Alternatively, MX is in the Aur for Arch users.
Accept all the default installation options.
CLion
While you can install CLion directly, its recommended to install it via Jetbrains Toolbox, which is a small utility for managing installed Jetbrains IDEs. Installation is very straightforward for both Windows and Mac.
On Windows, make sure to remove the toolbox app from the list of startup apps in task manager (unless you want toolbox to autostart for some reason…).
On Linux, toolbox is distributed as an appimage.
If you have VSC installed, on startup CLion will ask if you want to import your VSC settings. It is up to you, these settings are just things like keybinds and such.
Arm Toolchain
Next, we need to install the Arm GCC toolchain. This is the C/C++ compiler that targets the Arm CPU architecture, which is what is in almost all modern STM32 MCUs. Installation instructions vary depending on OS:
Windows and MacOS downloads are available on the Arm Toolchain Downloads Page. The latest release at writing is 15.2Rel1.
Windows
Scroll down to the Windows download section, titled Windows (mingw-w64-x86_64) hosted cross toolchains. Find the .msi installer link, and download. Install the downloaded .msi.
Next, we need to add the toolchain to the system path. This is essentially letting Windows know that we have added new executables to the computer. Most installers handle this for you, but for some reason the Arm toolchain does not.
Open Windows search, and type environment. Click the option for Edit the System Environment Variables:

In the window that pops up, click Environment Variables: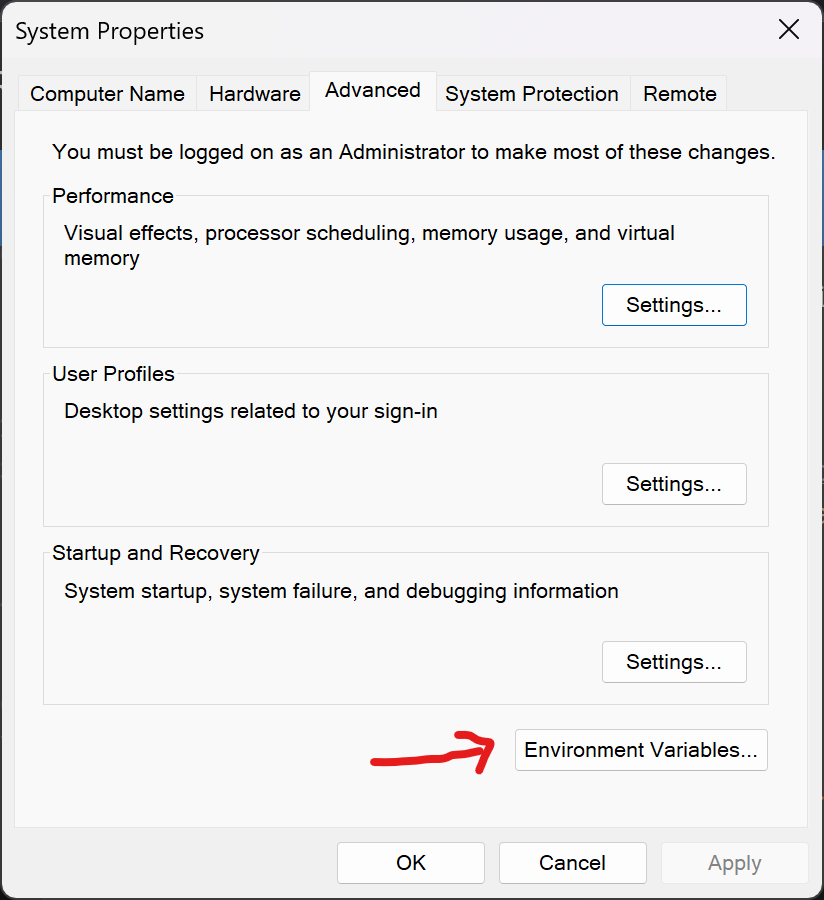
Then, click the entry for Path, and click edit:

Then, click New, then Browse:
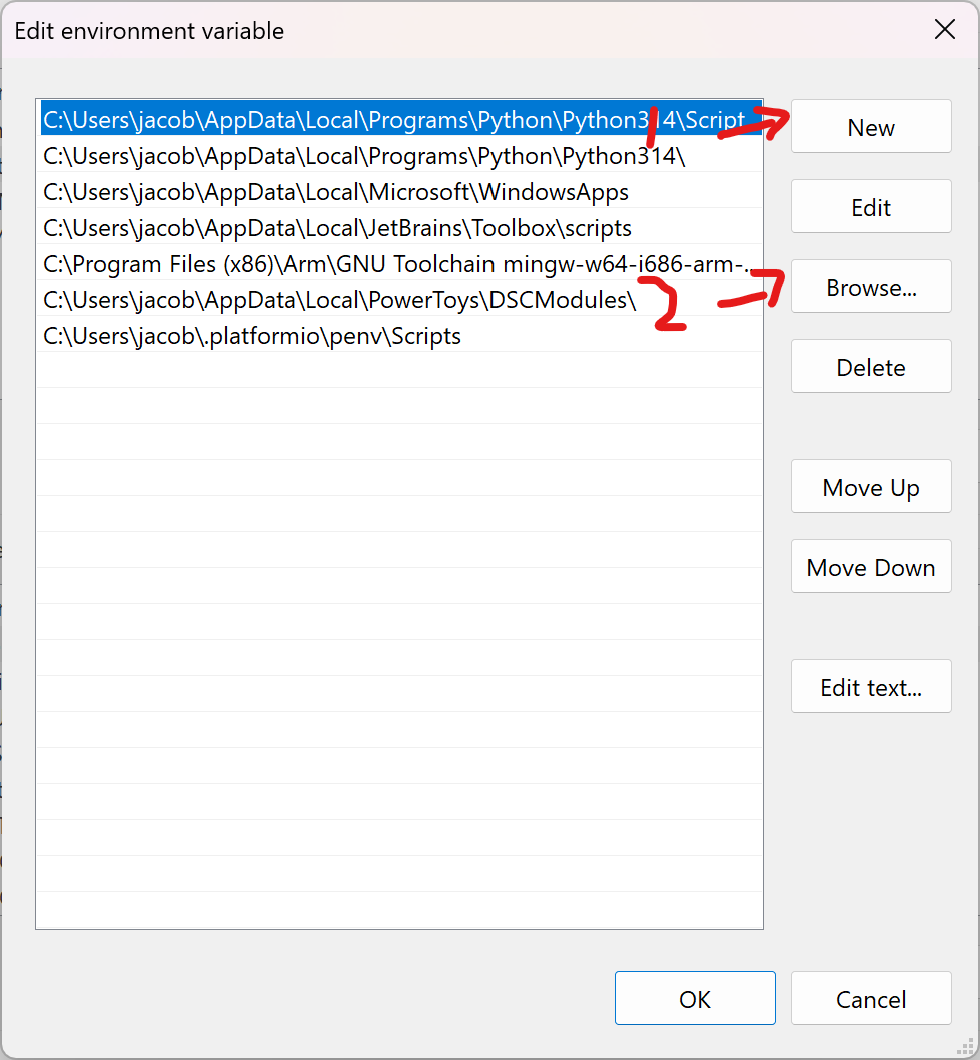
This will open a file explorer window. Browse to the folder C:\Program Files (x86)\Arm\GNU Toolchain mingw-w64-i686-arm-none-eabi\. Single click the bin folder, and click ok. Then, continue clicking ok buttons until the environment variable windows disappear.
As a quick test, open a command prompt and try this command: arm-none-eabi-gcc. It should give an error message stating there are no input files. If you instead get a message saying that it is not recognized as a command, then the installation was not successful. Go back and make sure the environment variable was edited correctly.
If CLion was already open, make sure to restart it after editing the system path to make sure the changes take effect in the IDE.
MacOS
Scroll down to the MacOS section, titled macOS (Apple silicon) hosted cross toolchains. Find the .pkg installer, and download. Once downloaded, install as usual.
Next, we need to add the executable to the system path. To do so, run this command in a terminal window: echo "export PATH=/Applications/Arm/15.2/bin:$PATH" >> .zshrc. NOTE: THIS PATH IS NOT CURRENTLY CORRECT! Edit this command to contain the correct path!
Now, fully restart the terminal window, and try the following command: arm-none-eabi-gcc. If the installation was successful, you should see an error message saying no input files were provided. Any other error likely means the installation was not successful.
If CLion was already open, make sure to restart it after editing the system path to make sure the changes take effect in the IDE.
Linux
The arm-none-eabi-gcc package is available in apt, pacman, and dnf. Install like any other package.
OpenOCD
The final program to install is OpenOCD. OpenOCD acts as a connector to interpret and send commands to our microcontroller. Installation instructions also vary depending on OS:
Windows
OpenOCD is available to download on windows through their github page. Go to the latest release on the right panel, and at the very bottom in the assets section, download the .tar.gz. After downloading, open your file explorer, go to the downloads folder, and extract the archive. Rename the extracted folder to just openocd. Next, move the folder to your home folder (C:\Users\<your username>) so we can find it later.
MacOS
OpenOCD is available to install through homebrew. Follow the installation instructions on the website if you do not already have homebrew installed. Then, install openocd with brew install openocd.
Linux
The openocd package is available in apt, pacman, and dnf. Install as any other package.
After Installing
After installing openocd, check to make sure CLion has recognized the exectuable. Go to CLion settings, Build, Execution, Deployment > Embedded Development. There will be a textbox for OpenOCD location (and a MX location, but this is not strictly necessary).
On Windows, this box will be blank. On Mac or Linux, openocd may be detected automatically, and you may be able to skip this step.
Tell CLion where to find the openocd executable. On Windows, if you moved the openocd folder into the correct location, the path will be C:\Users\<your user>\openocd\bin\openocd.exe.
Test the Environment
If you have not already, generate a project with MX (this is out of the scope of this page, see STM32CubeMX). Make sure to set the Toolchain/IDE field under Project Manager to CMake.
Next, open the code folder with CLion. If this is your first time opening a project, CLion will show a window asking to configure toolchains. Click next on this window.
Otherwise, CLion will show the CMake settings window. Make sure to disable all of the profiles in the list except for the one that does not say preset next to it by checking/unchecking the Enable Profile box on each one. Edit the CMake Options field to contain the value -DCMAKE_TOOLCHAIN_FILE=cmake/gcc-arm-none-eabi.cmake.
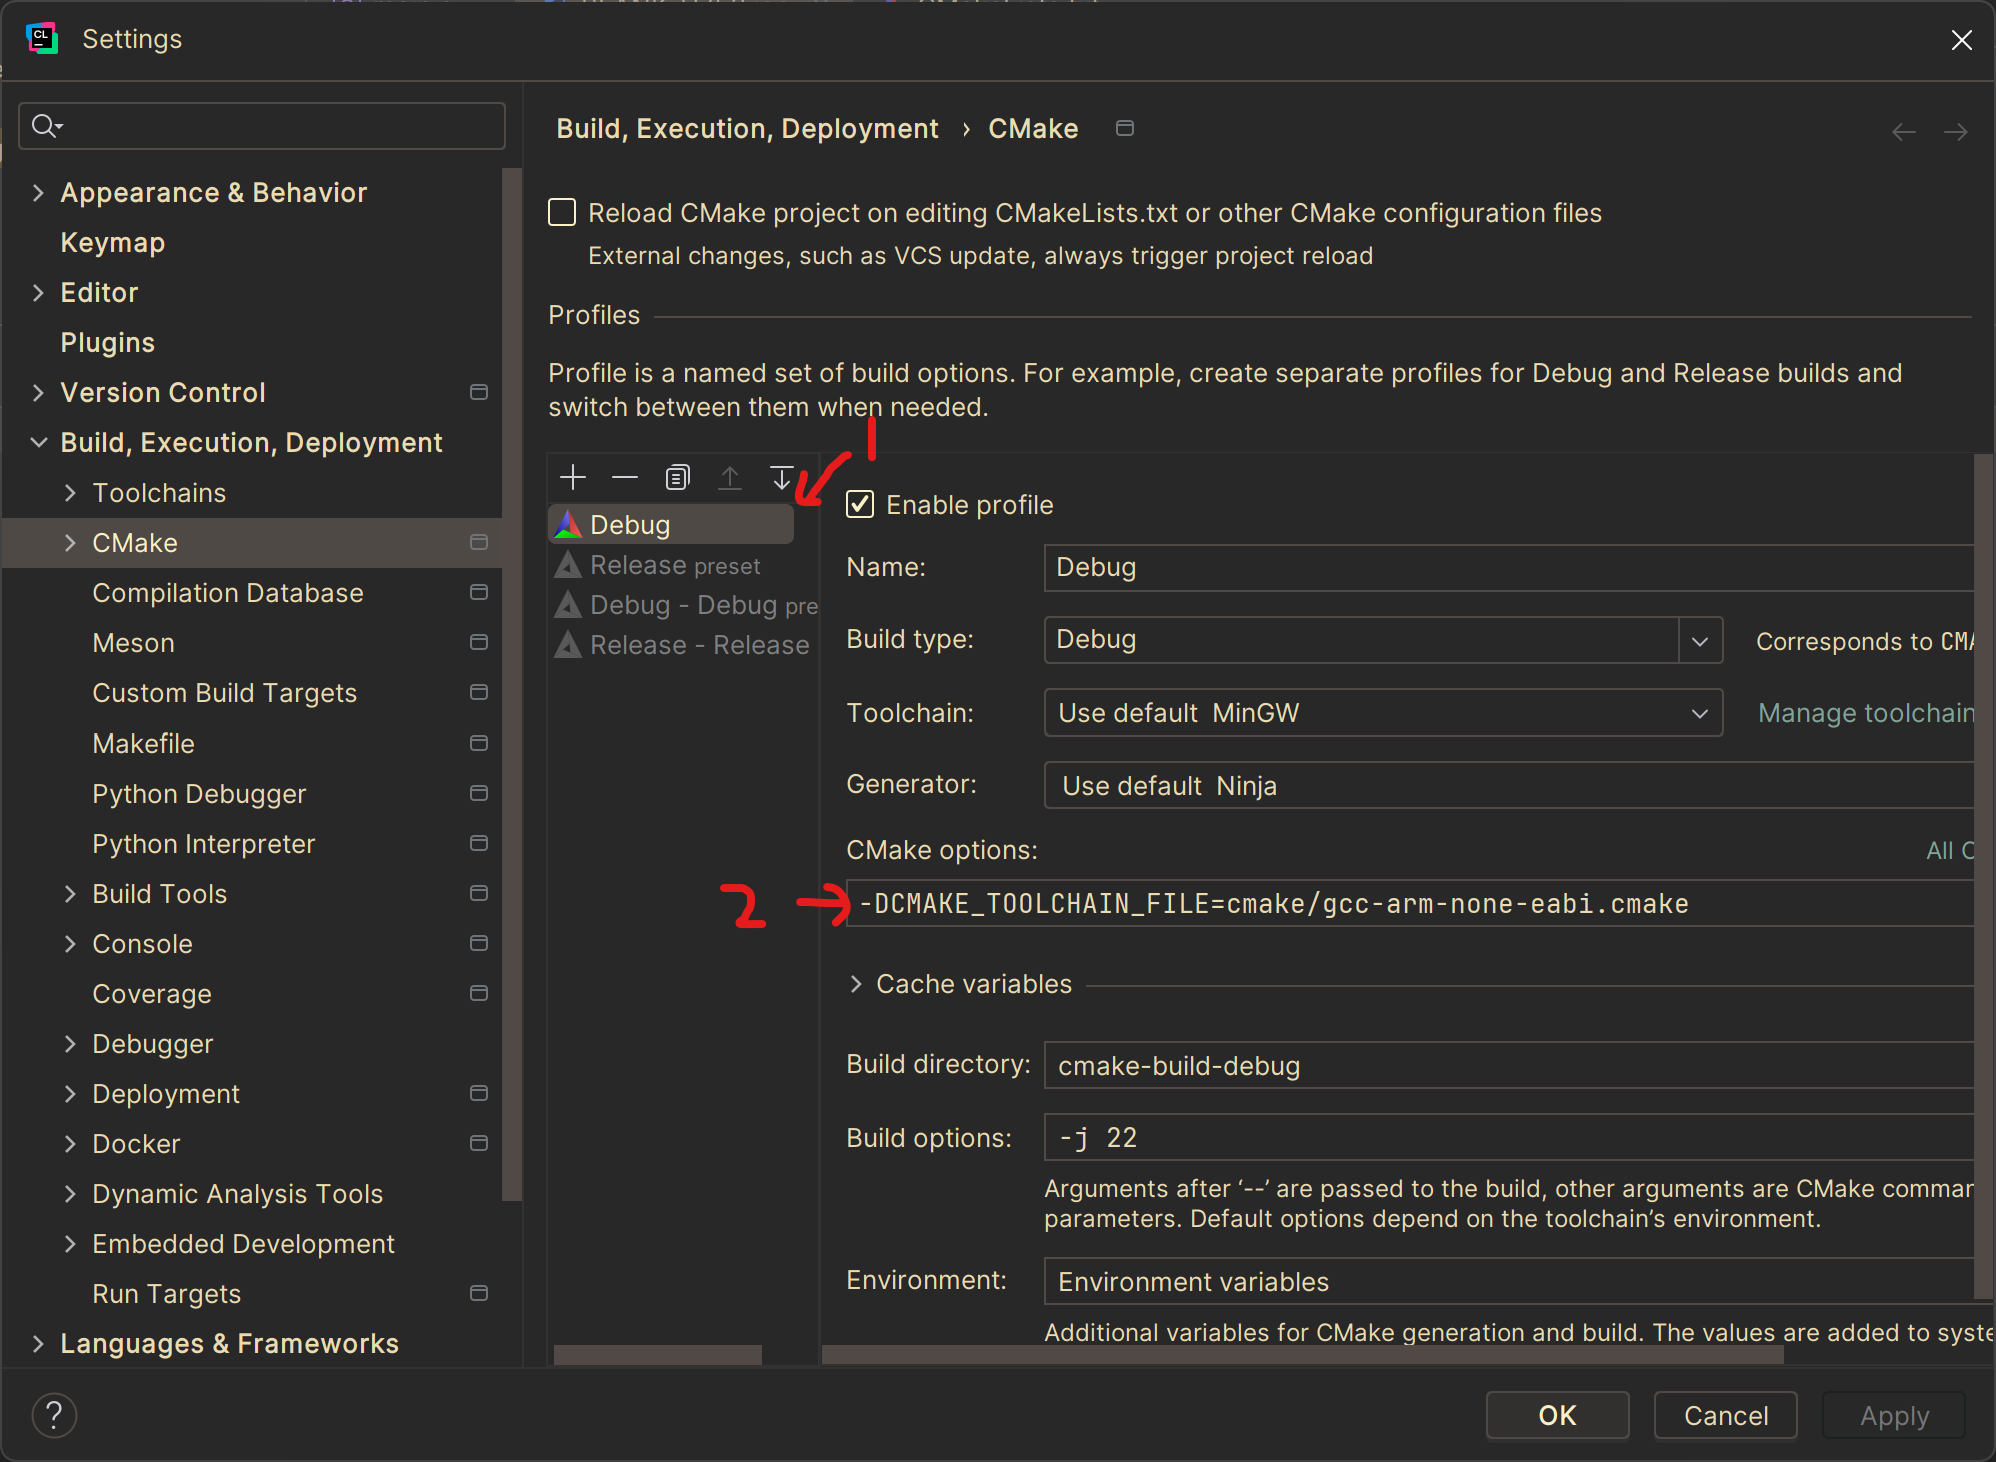
This CMake setting tells CMake and CLion to use the Arm toolchain we installed, and not the system compiler. THIS IS VERY IMPORTANT! YOUR CODE WILL NOT WORK WITHOUT THIS! Now click OK. In the CMake window (bottom left, there is a column of icons, one of them is for CMake). Open this to see the CMake output. It should say something along the lines of “generating done”. You may get a warning saying there are unused manually specified variables, but this can safely be ignored.
Now, click the build button (hammar icon in the top bar). This will build your code. If the build is successful, there should be no warnings or errors for a blank project.
At this point, you are now able to generate firmware files to be uploaded to the MCU.
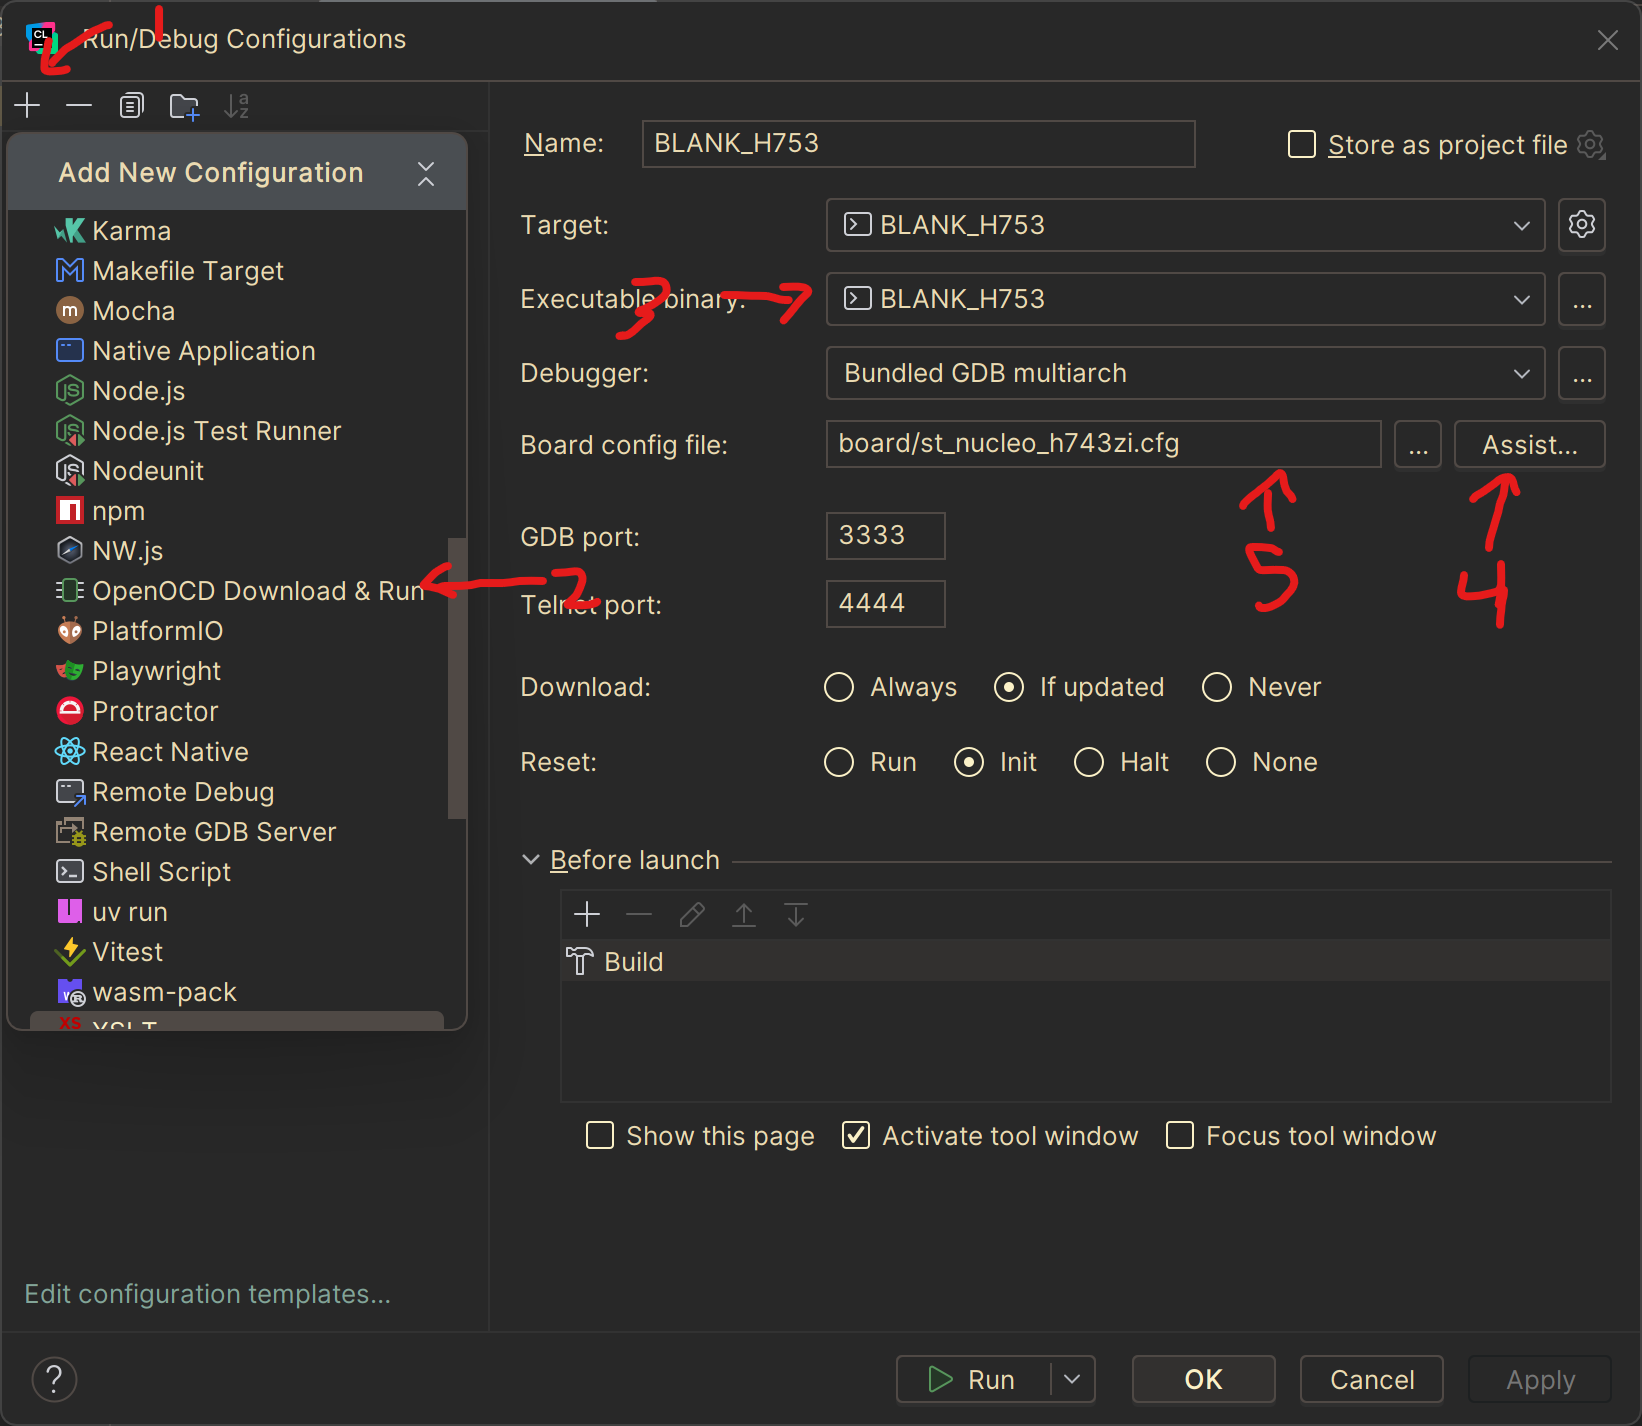
The final step is to tell CLion how to connect to the microcontroller via openocd. To the left of the build icon is a dropdown that has your project name. Open the dropdown, and click Edit Configurations. In the window that pops up, click the plus icon in the top left, and scroll and find OpenOCD Download & Run. Then, open the dropdown for Executable Binary and click the single option that appears. For Board Config File, click Assist. This will open another window with a list of config files. Scroll to find the appropriate config (if using the STM32H753 nucleo, use the file st_nucleo_h743zi.cfg) and click Use. Now click OK at the bottom to close the run configuration tab.
Now, to upload code, plug in the MCU/STLink/whatever, and click the green run button next to the build icon. This will run a build of the code, and upload the resulting firmware to the MCU. Alternatively, you can click the bug icon to start a debugging session.